- 1INTRODUCTION
- 2SETTING UP A NEW SYSTEM
- 2.1The Organisation Structure
- 2.1.1Creating, Editing and Deleting Organisation Chart Items/Adding Posts
- 2.2Users
- 2.2.1Creating, Editing and Deleting Users
- 2.2.2Supporting Data
- 2.2.2.1Access Levels and User Groups
- 2.2.2.2Reporting Group
- 2.3The Strategy Map
- 2.3.1Overview - Flat and Complex Models
- 2.3.2Creating, Editing And Deleting Strategy Map Items
- 2.3.3Strategy Item Types
- 2.3.4StrategyMap Performance Target items
- 2.3.5Strategic Contributions
- 2.3.5.1Normalising Strategic Contributions
- 2.3.5.2Flat Strategy Map
- 2.3.6 Strategy Map Tags
- 2.3.6.1Overview
- 2.3.6.2Setting up data tags
- 2.3.6.3Attaching data tags to performance targets
- 2.3.6.4Reporting data tags
- 2.4Performance Indicators
- 2.4.1Overview
- 2.4.2Performance Indicator List
- 2.4.3Creating, editing and deleting Performance Indicators
- 2.4.4Perspectives and Indicator Types
- 2.4.5Performance Indicators Set Up Considerations
- 2.4.6Supporting data
- 2.4.6.1Performance Indicator Categories
- 2.4.6.2Performance Indicator Types
- 2.4.6.3Scorecard Perspectives
- 2.4.6.3.1How to use Perspectives
- 2.4.6.4Scorecard Perspective Categories
- 2.4.6.4.1How to use Perspective Categories
- 2.4.6.4Units of Measure
- 2.4.6.5Time Intervals
- 2.5Equation Builder
- 2.5.1Creating, Editing, Deleting Equations
- 2.5.1.1Measurements
- 2.5.1.2Parameters
- 2.5.1.3Equations
- 2.5.1.4Example Equation
- 2.5.1.5Attaching Equations to Performance Indicators
- 2.5.1.6Using Performance Indicators in an Equation
- 2.5.1.7Equation measurement workflow
- 2.5.1Creating, Editing, Deleting Equations
- 3PERFORMANCE TARGETS
- 3.1Overview
- 3.2Rules Governing Performance Targets
- 3.3Target Setup: Add/View Targets
- 3.4Target Setup: Target Creation Wizard
- 3.5Entering Target Measurements, Validation and Reporting
- 3.6Editing target fields and related objects
- 3.6.1Edit target fields
- 3.6.2Edit target measurements
- 3.6.3Edit target comments
- 3.6.4Edit target delegation
- 3.7Add/View Responsibility
- 3.8Editing target value for more than one measurer
- 3.9Ending targets
- 3.10TargetExport and Import
- 3.11Exporting Target Data
- 3.12Importing Performance Data (from Measurement Entry window)
- 4ACTION PLANNING
- 5ASSESSMENTS
- 6THE CONTROL PANEL
- 6.1Header Buttons
- 6.2Control Panel tabs: Overview
- 6.3Control Panel display
- 6.4Control Panel tabs
- 6.4.1Dashboard Tab
- 6.4.2Task Tab
- 6.4.2.1Measurement Tasks
- 6.4.2.2Validation Tasks
- 6.4.2.3Action Plan Tasks
- 6.4.3.4Assessment Tasks
- 6.4.3.5Measurement Planner
- 6.4.3Performance Targets Tab
- 6.4.4Reports Tab
- 6.4.5Staff and All Users Tab
- 6.4.6Action Plan Tab
- 7REPORTS
- 8SYSTEM MAINTENANCE
- 9HELP AND SUPPORT
- 2.1The Organisation Structure
Performance Targets
- Overview
- Rules Governing Performance Targets
- Target Setup: Add/View Targets
- Target Setup: Target Creation Wizard
- Step 1: Identify Indicator and Dates
- Set Target Fields
- Target Start Value Examples
- Step 3: Identify Oversight Responsibility
- Step 4: Target Title
- Step 5 and 6: Assign Measurement Responsibility and Save Target
- Multiple Measurement Assignment
- Entering Target Measurements, Validation and Reporting
- Editing target fields and related objects
- Edit target fields
- Edit target measurements
- Edit target comments
- Edit target delegation
- Add/View Responsibility
- Description of responsible posts
- Changing measurement responsibility
- Editing target value for more than one measurer
- Ending targets
- Target Export and Import
- Exporting Target Data
- Importing Performance Data (from Measurement Entry window)
Overview
Performance targets are defined by performance indicators attached to a measurable part of the organisation's strategy map run over a specific period of time
A target is assigned a measurer, reporter, validator and owner. In theory these roles could be occupied by the same post but in practice typically the measurer is a distinct post from the reporter/validator/owner.
Targets running continually over successive time periods can be added using the target setup wizard (e.g. Target1 (2008/9), Target2 (2009/10), Target3 (2010/11) etc.
Rules Governing Performance Targets
- There can be more than one performance target assigned to a particular measurable aim, objective or target, using one or more indicators but the performance targets' dates must not overlap.
- Performance targets can be nested (i.e. by attaching under another measurable strategy map item) but these items should not be given a contribution (see nested measurable strategy map items).
- Default start dates for new targets with no previous targets are day after target set-up.
- Default start dates for new targets following on from a previous target on the same strategy map item are the day after the last target ends.
- Default target duration is one year.
- When changing a target's measurement interval do not change the interval of the performance indicator as this will change the graph intervals. Use 'Save new' feature and create a new indicator instead.
To avoid confusion, it is simpler for only one person within an organisation to supply measurements for a specific performance target at a time. However, the system does allow for multiple measurement assignments (see target setup: multiple measurers or Measurement entry below).
Add/View Target
To view and / or add targets, right click on a strategy map item that has, or is about to be assigned, a performance target and select Add/View Targets:
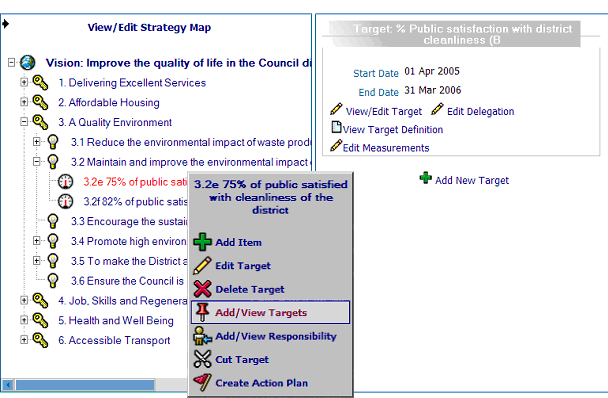
The system performance target wizard goes step-by-step through linking a Performance Indicator to a target item in order to create a performance target. For an explanation of the fields in the target set up see Description of target fields below.
Performance Target Wizard (target setup steps 1 - 6)
After accessing Add/View Targets, click on the Add New Target button in the right hand side menu and follow the steps 1 - 6:
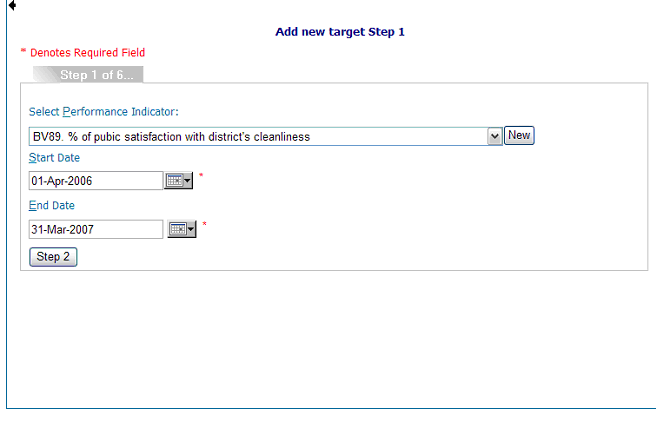
Step 1
Clicking the Add Target button from Add/View Targets will start the target creation wizard. In the example used to demonstrate these steps a new target is being created based on an existing target so many of the fields will be pre-populated with the previous target's information and the system's rollover of previous settings and results. The following process is identical for new targets, however, minus the default population of fields:
Step 2
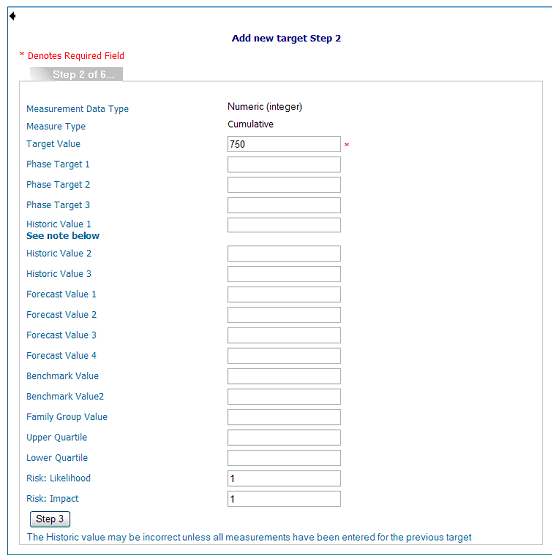
Fill in the fields as needed. Descriptions of each field are given below:
Description of target fields
Phase targets
This field will not be present unless the performance indicator associated with the target has a reporting frequency greater than one. When present this field can always be edited. The number of phases available is the duration of the target divided by its reporting period (not measurement interval) e.g. a target that runs for a year and has a quarterly measuring period will have three phases available.
Phase targets allow the expected progress of a target to be taken into account. For example, if the implementation of a recycling program will take 3 months a phase target can for example, be set lower for the first three months and then higher for the remainder of the target period. Note: phase targets are not available when adding a performance target to a "date" measure.
Target Start Values
This field can always be edited. For new targets, if there are no pre-existing targets for the strategy map item, the default Target Start Value is zero. When there are pre-existing targets the Target Start Value is populated from the last target's last calculated measurement. If there are no phase targets, the system will calculate performance over the target's duration based on the Target Start Value and the target itself. Target Start Value and phase targets can work together.
See TSV examples.
Historic values
These fields can always be edited. Historic 1 values default populate with the previous target's last calculated value while Historic 2 value populate's with last target's historic value 1 (etc).
Forecast values
These fields can always be edited. Entering in these values allows the target to be automatically forecast for the next time the performance target is run (if ever). If the target is set to run an additional duration then the Forecast Value 1 will be automatically set as the new target value and the Forecast Value 2 will be set as the new Forecast Value 1.
Quartiles / Benchmark values
These fields can contain values to rate the organisation's performance against other comparable organisations and / or internal or outside authority guidelines.
Risk: Likelihood / Risk: Impact
These fields can accept any whole number value, thus allowing simple risk assessment to be added to strategic targets. Risk scores are reported on group reports.
Step 3
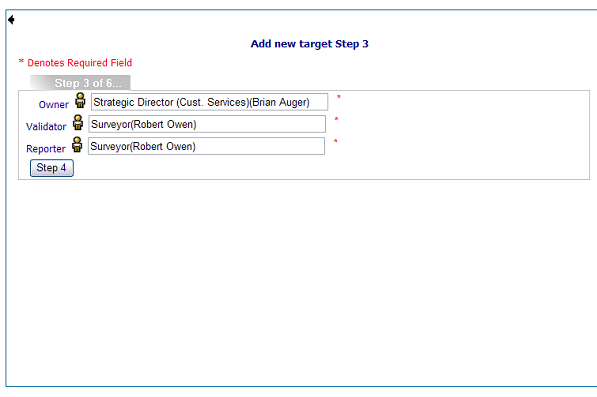
Click on the post icons to select the appropriate post for the roles of Owner, Validator and Reporter.
Note: reporter doesn't actually have any specific function in the system but both the owner and validator can view the performance for their target. The validator will receive notification of validation tasks when they are due).
Step 4
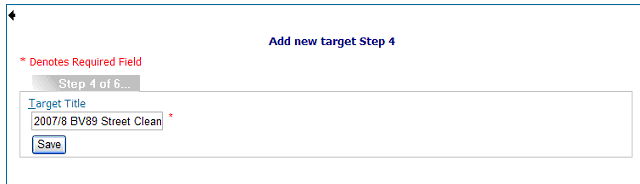
Enter in title (it is usually suggested to include the title of the indicator
used, the date range the target covers and the desired target value. Press
Save to prompt for measurer assignment.
Step 5 and 6 Assigning Measurement Responsibility and Saving Target
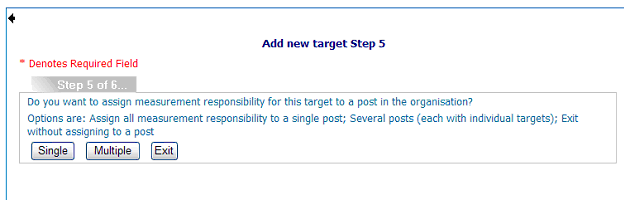
Assigning measurement responsibility to one post click on 'Single' button and the post icon displays the system's organisation chart:
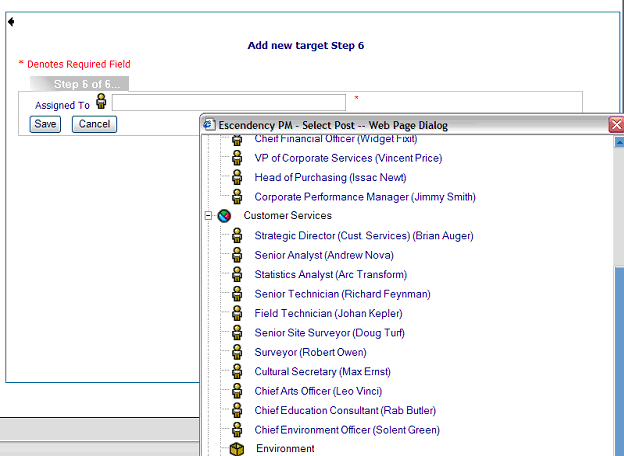
Selecting the post from the chart completes the target setup and the user has the option to save or cancel:

If you do not wish to assign measuring responsibility at this point, click the button labelled ‘exit’ on the Assign Responsibility page. The system will return to the Strategy Map view. To assign responsibility to a previously created target without assignment, right click on the relevant Strategy Map item and select ‘Add/View Responsibility’ from the pop-up menu. Click the ‘View/Add Responsibility’ link for the relevant target will open the same page as described above so assignment can be added.
Note: Measurement of a target cannot take place unless responsibility has been assigned
Multiple Measurement Assignment
For assignment to more than one post, click on the button labelled ‘Multiple’
in step 5 of the target set up wizard. The multiple responsibility assignment
page will be displayed, showing the organisation structure with textboxes
alongside each item:
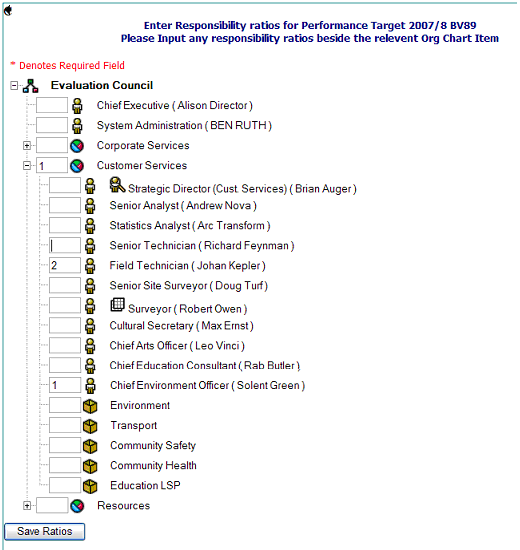
For each post for which measurement responsibility is to be assigned, enter a value indicating the ratio of responsibility;
For example, for assignment of a total target of 600 units to two posts in the same team entering values or 2 & 1 against the posts will result in personal targets of 200 and 400. Entering values of 1 & 1 will result in personal targets of 300 each. Responsibility ratios can be split across other parts of the organisation, not just posts. However every branch that has a responsibility assigned must ultimately go down to at least one post.
When all ratios have been entered, click the ‘Save Ratios’ button to complete the target assignment.
Entering Measurements and Validation
See measurement entry for full details on how data is entered (including export and import) and control panel tasks for validation.
Editing targets
From the Add/View Targets window it is possible to edit the target value, edit the target parameters, edit past measurements and to delegate measurement tasks. It is not possible to edit the target value here for multiple measurers - this must be done in the 'Edit Target Value Ratios' window that is accessed from the 'Add/View Responsibility option (see below and and then only if the target date has not been passed.
Edit target fields
To edit target fields click on the 'View/Edit Target' link. This opens the target edit window which is similar to the Add New Target step 2 window (figure 3). Here it is possible to change existing target's phases (if applicable), historic values, forecast values, benchmark values, family group values, upper and lower quartiles, and owner/validator/reporter assignments:
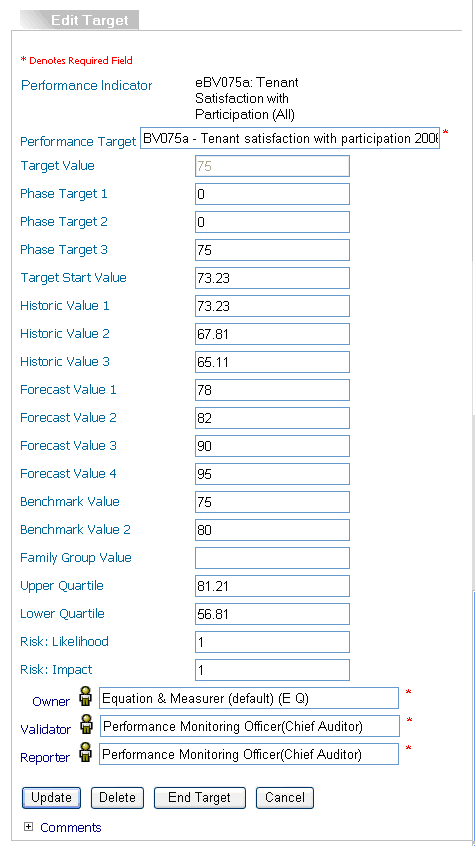
To save any changes made in the View/Edit Target window, click on the 'update' button. To delete the target click on the 'delete' button. The user will be asked to confirm deletion. After deletion the target is no longer active or visible anywhere on the system and the action is not reversible (other than by contacting Escendency support).
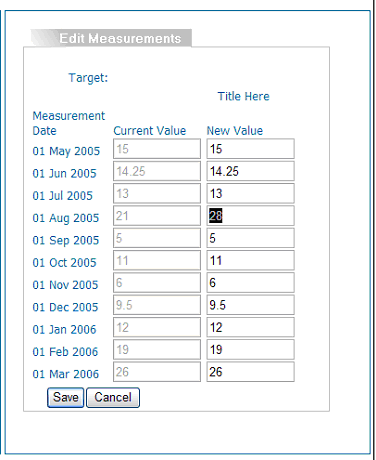
Edit target measurements
To edit target measurements, click on the 'Edit Measurements' link (figure 1) and enter in the corrected measurement values (figure 4).
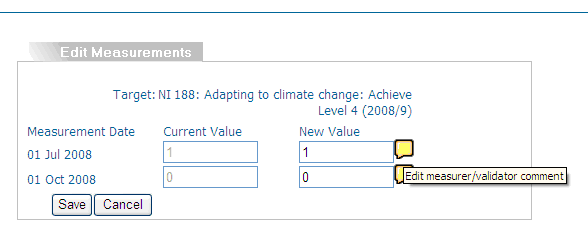
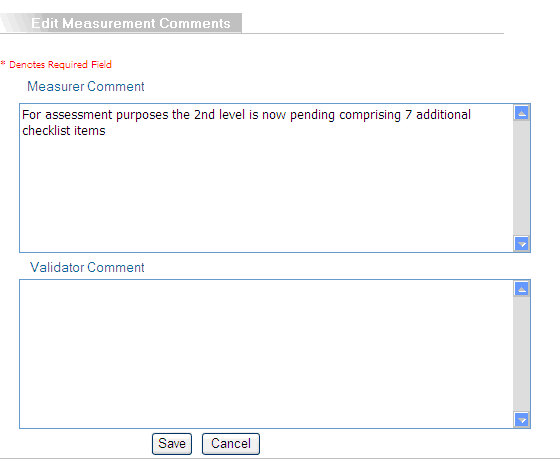
Edit comments
Measurer and validator comments can be edited from the Edit Measurement option
above by clicking on the  icon:
icon:
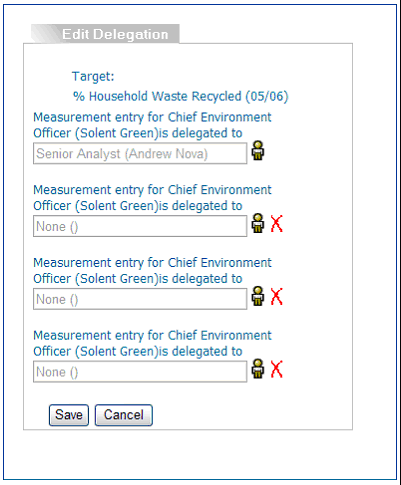
Edit delegation
To delegate target measurement task, click on the 'Edit Delegation' link (figure 1) to list all the pending measurement tasks for that target and select the post to accept the new measurement task (figure 7). This is a useful feature if the assigned measurer will be absent during measurement period/s. The delegated measurer will then receive the tasks in their inbox.
Note: the assigned validators will still see that the measurement responsibility belongs to the original measurer. Note: To change the measurer, rather than just delegate one or more tasks, see Changing Measurement Responsibility, a function of Add/View Responsibility below.
Add/View Responsibility
Use this option to view the organisation responsibility for a target, to remove and reassign measurement responsibility and to change a target value (if the target end date has not passed). A performance target can have an owner, a validator, and a reporting post chosen from posts within the organisation The holders of these posts have overall responsibility for the measuring of performance targets and are indicated accordingly:
- Key
-


- Owner
-

- Validator
-

- Reporter
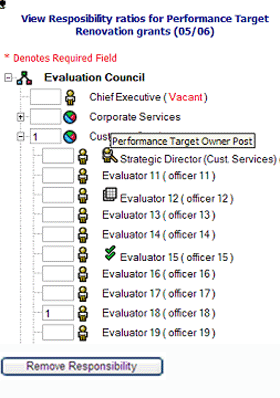
Measurement posts are signified by a number next to them (in this example Evaluator 18 is the sole measurement inputter).
Description of responsible posts
The target owner is ultimately responsible for the measure of performance targets and target reports that they can access from "my reports" page on the control panel. The target owner can see reports on a particular target at any time.
The reporting post holder is alerted when reports on a target are due. Periods at which reports are due are set by the performance indicator's "reporting interval" field (see performance indicator help).
The validation post holder is responsible for validating measurement data entered by the measurer/s and will receive validation tasks on their "my tasks" page on the control panel. Periods at which validation tasks are due are set by the performance indicator's "validation interval" field (see performance indicator help). A yellow triangle icon with a post name on the right of a validation task in the validator's task tab, alerts the validator to the post that has measurements overdue.
Each user in a responsible post will also get data entry tasks for the target on their "my tasks" panel in the control panel, at intervals determined by the performance target's performance indicator's "reporting interval" field.
If more than one user is responsible for entering data for a performance target, more than one validation task will appear on the validator's control panel. One validation task will appear for the data entered by each user.
Changing measurement responsibility
From add/view responsibility window it's possible to change measurement responsibility by first removing the current measurer/s and then adding in the new one/s:
Remove responsibility alert
Click on the Remove Responsibility button - this will bring up the following alert:

Note: if losing measurements already input into the system is not acceptable it's always possible to delegate the remaining measurement tasks (see Edit delegation above, a function of the Add/View Targets option).
Post responsibility ratio window
If you accept the loss of existing measurements click 'ok' and this will bring up the responsibility ratio window:
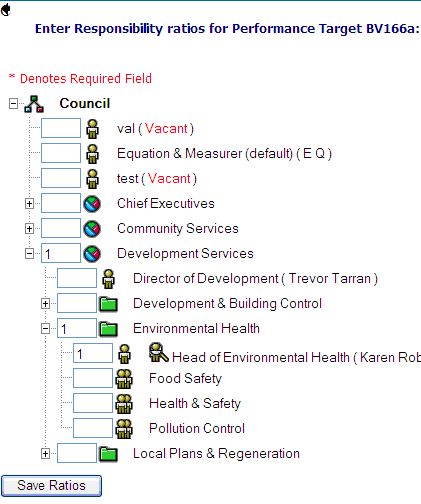
Measurement Responsiblity Numbers
Enter in a number next to the new post/s that are to have measurement responsibility and then click the 'Save Ratios' button. The system will then calculate up the ratios. Any number can be entered though 1 is normal for single measurement responsibility. For multiple measurers the ratios are more important because they can weight individual's contribution (e.g. if there were two measurers and one had a ratio value of 1 and the other of 2 the one with 2 would contribute twice as much to the parent's performance status as the one with 1).
Note: Reponsibility and contribution: Responsibility can be spread amongst more than one post. Each responsible post can also be weighted differently. For example, a post with a weighting of 2 will have to contribute twice as much as a post weighted with 1 to have the same effect on the organisation's performance. Contributions are relative to other items with the same parent item in the tree. All of the performance target contributions to the performance plan can be viewed in the Strategic Contributions module.
Note: Numbers rolling up: The organisation structure items between the first contribution and the root of the tree will be populated with a 1. These numbers can be edited if necessary to adjust contributions. However, entering a zero anywhere in the tree forces all items below to also be changed to zero.
Editing Target Values for More Than One Measurer
Performance target values for more than one measurer are edited from the 'Add/View Responsibility' option and only if the target end date has not been exceeded. To edit a target, select the Edit Targets option (in the 'Add/View Responsibility' page) for the relevant performance target. Only targets with an end date later than the current date will dispaly this option. This will open the Edit Target Values page:
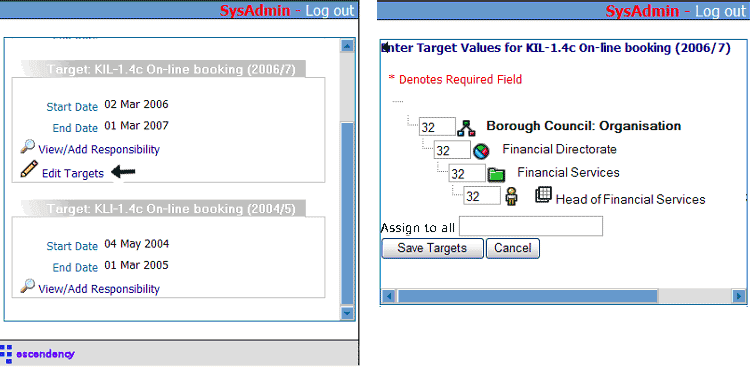
Page above shows the part(s) of the organisation tree that have been assigned responsibility for measuring/achieving the required target with their current target in the text boxes alongside.
To edit a target for a part of the organisation, simply enter a new value into the relevant text box. This feature is useful for targets measured by more than one measurer.
If all parts of the organisation are to have the same target value (as would be the case if there is only one post with measurement responsibility), entering a value in the 'Assign to all' field will force all items to this target.
When targets have been assigned, clicking the 'Save Targets' button will update the target values and return the user to the 'add/view responsibility' page.
WARNING: The system does not check that assigned targets are consistent across all items within the organisation. It is possible for post-level targets to be greater or less than their parent items. This behaviour is by design.
Ending Targets
To end a target click the 'End Target' button. Ended targets will still be displayed in the system (until year end rollover then they will only be visible in the historic CPO along with completed targets). There are 3 options to end a target:
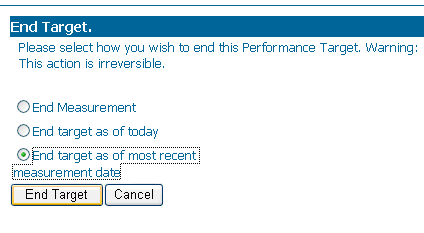
- 'End Measurement' to be used if no more measurements are required for the target: For example, if the target is reached early and there is no need for additional measurements (for example a financial goal) then the target can still run until the end but no more measurement tasks will be prompted for;
- End target as of today' to stop any subsequent measurement tasks appearing. Note: any measurement tasks outstanding before this action will still be active;
- 'End target as of most recent measurement date' which will end the target at the latest entered measurement. For example, if the target is quarterly measured and is stopped using this option after 5 months but has only the first quarter measurement in place then there will be no prompts for a second measurement;
Note: Option 2 and 3 will affect the target wizard if subsequent targets have not already been completed (i.e. a new target created after one ended today will default start tomorrow).
Export / Import Targets
It is possible to export one or more targets, and all their associated measurements, into a spread sheet format. This is particularly useful for remote measurements of performance targets (for example litter and detritus counts) where web access is not readily available. Completed spread sheets can then be re-imported into the system using the Import Data function in the Measurement Entry window.
Click the next button below for example of setting up export and import targets:
![]()
![]()