- 1INTRODUCTION
- 2SETTING UP A NEW SYSTEM
- 2.1The Organisation Structure
- 2.1.1Creating, Editing and Deleting Organisation Chart Items/Adding Posts
- 2.2Users
- 2.2.1Creating, Editing and Deleting Users
- 2.2.2Supporting Data
- 2.2.2.1Access Levels and User Groups
- 2.2.2.2Reporting Group
- 2.3The Strategy Map
- 2.3.1Overview - Flat and Complex Models
- 2.3.2Creating, Editing And Deleting Strategy Map Items
- 2.3.3Strategy Item Types
- 2.3.4StrategyMap Performance Target items
- 2.3.5Strategic Contributions
- 2.3.5.1Normalising Strategic Contributions
- 2.3.5.2Flat Strategy Map
- 2.3.6 Strategy Map Tags
- 2.3.6.1Overview
- 2.3.6.2Setting up data tags
- 2.3.6.3Attaching data tags to performance targets
- 2.3.6.4Reporting data tags
- 2.4Performance Indicators
- 2.4.1Overview
- 2.4.2Performance Indicator List
- 2.4.3Creating, editing and deleting Performance Indicators
- 2.4.4Perspectives and Indicator Types
- 2.4.5Performance Indicators Set Up Considerations
- 2.4.6Supporting data
- 2.4.6.1Performance Indicator Categories
- 2.4.6.2Performance Indicator Types
- 2.4.6.3Scorecard Perspectives
- 2.4.6.3.1How to use Perspectives
- 2.4.6.4Scorecard Perspective Categories
- 2.4.6.4.1How to use Perspective Categories
- 2.4.6.4Units of Measure
- 2.4.6.5Time Intervals
- 2.5Equation Builder
- 2.5.1Creating, Editing, Deleting Equations
- 2.5.1.1Measurements
- 2.5.1.2Parameters
- 2.5.1.3Equations
- 2.5.1.4Example Equation
- 2.5.1.5Attaching Equations to Performance Indicators
- 2.5.1.6Using Performance Indicators in an Equation
- 2.5.1.7Equation measurement workflow
- 2.5.1Creating, Editing, Deleting Equations
- 3PERFORMANCE TARGETS
- 3.1Overview
- 3.2Rules Governing Performance Targets
- 3.3Target Setup: Add/View Targets
- 3.4Target Setup: Target Creation Wizard
- 3.5Entering Target Measurements, Validation and Reporting
- 3.6Editing target fields and related objects
- 3.6.1Edit target fields
- 3.6.2Edit target measurements
- 3.6.3Edit target comments
- 3.6.4Edit target delegation
- 3.7Add/View Responsibility
- 3.8Editing target value for more than one measurer
- 3.9Ending targets
- 3.10TargetExport and Import
- 3.11Exporting Target Data
- 3.12Importing Performance Data (from Measurement Entry window)
- 4ACTION PLANNING
- 5ASSESSMENTS
- 6THE CONTROL PANEL
- 6.1Header Buttons
- 6.2Control Panel tabs: Overview
- 6.3Control Panel display
- 6.4Control Panel tabs
- 6.4.1Dashboard Tab
- 6.4.2Task Tab
- 6.4.2.1Measurement Tasks
- 6.4.2.2Validation Tasks
- 6.4.2.3Action Plan Tasks
- 6.4.3.4Assessment Tasks
- 6.4.3.5Measurement Planner
- 6.4.3Performance Targets Tab
- 6.4.4Reports Tab
- 6.4.5Staff and All Users Tab
- 6.4.6Action Plan Tab
- 7REPORTS
- 8SYSTEM MAINTENANCE
- 9HELP AND SUPPORT
- 2.1The Organisation Structure
Measurement Entry
Performance target measurements are entered via selecting a PI Measurement task listed under the user's Tasks tab (see Task tab help for more information on different tasks and the user's task tab). If the user has no measurement tasks due none will be displayed. If a user wishes to add a future measurement before being prompted in their task tab they can do so using the measurement planner.
The measurement entry window comprises 4 tabs: Measurement Entry, Import Data, Measurement History and Graph (see figure 1). Note: measurement entry for measurements used in equations comprise only the Measurement Entry tab (see Equation Measurement tasks figure in Task tab help).
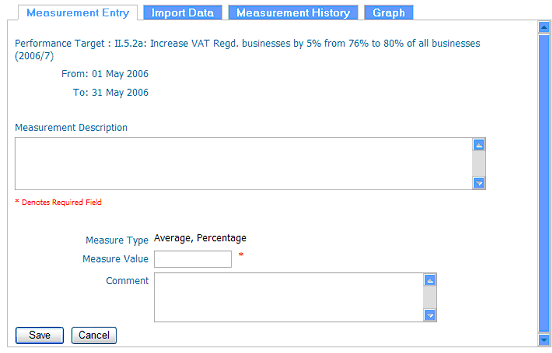
Figure 1: Measurement Entry window for a performance target
To enter data, enter the amount in the "measure value" box, in the stated units, and enter any comment in the "comment" box. Then press "Save".
Note: if the field is in currency or percentage the values will have to be entered with 2 decimals (e.g. 98.00 or 455.67).
To put off data entry until another time, press the "Cancel" button.
"Measure Type": tells the user how data is represented in reports and in the "My Indicators " tab. For more information see Measure Type in performance indicator help.
Import Data tab
If the performance indicator being measured has been previously exported as a spreadsheet and measurements added in the field, the spreadsheet can be re-imported to the system using this function (for exporting performance target data as a spreadsheet see Export Target Data help and Performance Indicator Library help). This can circumvent the need to enter measurements in the Measurement Entry field.
In the Import Data tab (figure 2), click the 'Browse' button to locate the file (figure 2.2) and then upload and validate the file format (figure 2.3):
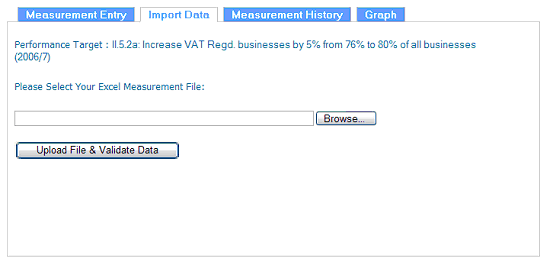
Figure 2: Import Data tab in the Measurement Entry task window
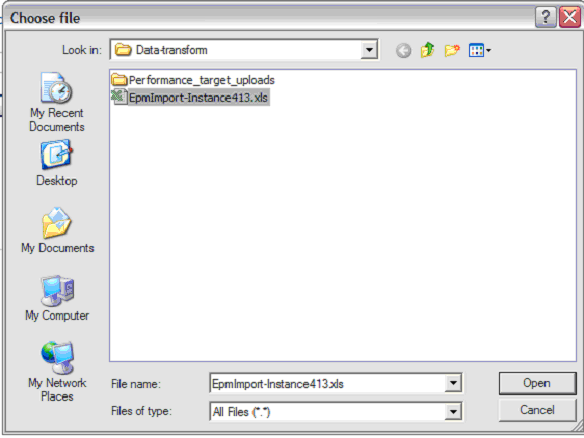
Figure 3: Browsing to previously exported performance indicator file to upload into system
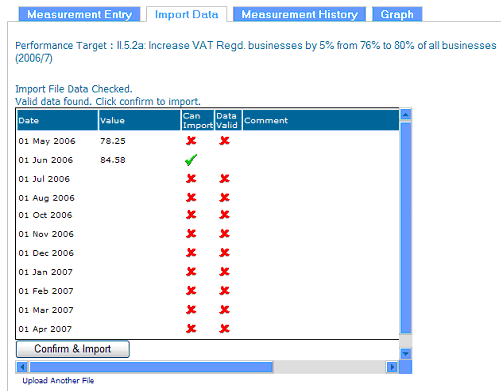
Figure 2.3: Uploading and validating imported performance target data. In this example the first value for 01 May 2006 is not validated because a value already exists in the database for that month (77.00 - see figure 5).
Selecting 'Confirming & Import' will update the target database with the measurment inputter's user id so they do not have to manually enter in the measurements. This is clearly a useful function if measurements have been made out in the field over the performance target's duration.
Measurement History tab
Selecting this tab allows users to view all measurement history associated with the active (not ended) performance target (users cannot edit the value/s - this can only be done in the strategy map on the 'Add/View Targets' 'Edit Measurements' option). See figure 5 for an example:

Figure 5: Measurement History tab in the Measurement Entry window
Graph tab
Selecting this tab displays the performance indicator graph (in real time) along with detailed and drill down information on the performance target (figure 6).
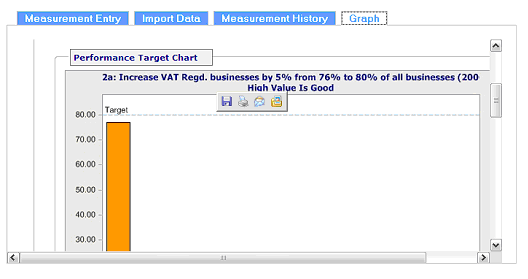
Figure 6: Graph tab display for Measurement Entry window