- 1INTRODUCTION
- 2SETTING UP A NEW SYSTEM
- 2.1The Organisation Structure
- 2.1.1Creating, Editing and Deleting Organisation Chart Items/Adding Posts
- 2.2Users
- 2.2.1Creating, Editing and Deleting Users
- 2.2.2Supporting Data
- 2.2.2.1Access Levels and User Groups
- 2.2.2.2Reporting Group
- 2.3The Strategy Map
- 2.3.1Overview - Flat and Complex Models
- 2.3.2Creating, Editing And Deleting Strategy Map Items
- 2.3.3Strategy Item Types
- 2.3.4StrategyMap Performance Target items
- 2.3.5Strategic Contributions
- 2.3.5.1Normalising Strategic Contributions
- 2.3.5.2Flat Strategy Map
- 2.3.6 Strategy Map Tags
- 2.3.6.1Overview
- 2.3.6.2Setting up data tags
- 2.3.6.3Attaching data tags to performance targets
- 2.3.6.4Reporting data tags
- 2.4Performance Indicators
- 2.4.1Overview
- 2.4.2Performance Indicator List
- 2.4.3Creating, editing and deleting Performance Indicators
- 2.4.4Perspectives and Indicator Types
- 2.4.5Performance Indicators Set Up Considerations
- 2.4.6Supporting data
- 2.4.6.1Performance Indicator Categories
- 2.4.6.2Performance Indicator Types
- 2.4.6.3Scorecard Perspectives
- 2.4.6.3.1How to use Perspectives
- 2.4.6.4Scorecard Perspective Categories
- 2.4.6.4.1How to use Perspective Categories
- 2.4.6.4Units of Measure
- 2.4.6.5Time Intervals
- 2.5Equation Builder
- 2.5.1Creating, Editing, Deleting Equations
- 2.5.1.1Measurements
- 2.5.1.2Parameters
- 2.5.1.3Equations
- 2.5.1.4Example Equation
- 2.5.1.5Attaching Equations to Performance Indicators
- 2.5.1.6Using Performance Indicators in an Equation
- 2.5.1.7Equation measurement workflow
- 2.5.1Creating, Editing, Deleting Equations
- 3PERFORMANCE TARGETS
- 3.1Overview
- 3.2Rules Governing Performance Targets
- 3.3Target Setup: Add/View Targets
- 3.4Target Setup: Target Creation Wizard
- 3.5Entering Target Measurements, Validation and Reporting
- 3.6Editing target fields and related objects
- 3.6.1Edit target fields
- 3.6.2Edit target measurements
- 3.6.3Edit target comments
- 3.6.4Edit target delegation
- 3.7Add/View Responsibility
- 3.8Editing target value for more than one measurer
- 3.9Ending targets
- 3.10TargetExport and Import
- 3.11Exporting Target Data
- 3.12Importing Performance Data (from Measurement Entry window)
- 4ACTION PLANNING
- 5ASSESSMENTS
- 6THE CONTROL PANEL
- 6.1Header Buttons
- 6.2Control Panel tabs: Overview
- 6.3Control Panel display
- 6.4Control Panel tabs
- 6.4.1Dashboard Tab
- 6.4.2Task Tab
- 6.4.2.1Measurement Tasks
- 6.4.2.2Validation Tasks
- 6.4.2.3Action Plan Tasks
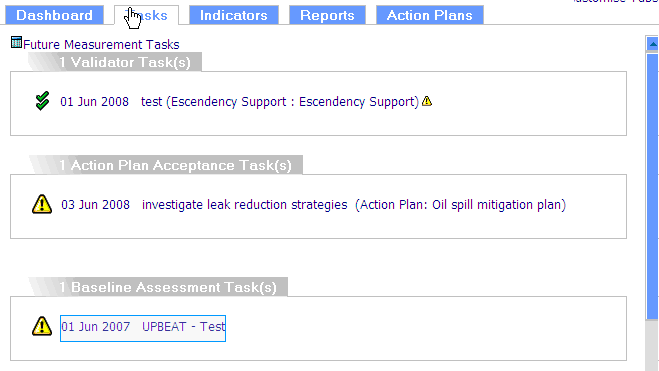
- 6.4.3.4Assessment Tasks
- 6.4.3.5Measurement Planner
- 6.4.3Performance Targets Tab
- 6.4.4Reports Tab
- 6.4.5Staff and All Users Tab
- 6.4.6Action Plan Tab
- 7REPORTS
- 8SYSTEM MAINTENANCE
- 9HELP AND SUPPORT
- 2.1The Organisation Structure
Assessment Module

 Components of and the Setting up of Assessment projects
A. Overview
The Assessment module allows users to easily perform checklist assessments that encompass a range of categories that can be related to any type of system object or used as a stand alone assessment. As such assessments can be used for:
- Risk Assessments
- HR Appraisals
- Student evaluations
- Satisfaction Surveys
- Environmental Impact
- Projects
It's possible to perform assessments on a regular basis and to report progress in a number of ways.
The module comprises three tools accessed from the  button: Assessments, Assessment Types and Assessment Categories.
Note: The initial driver for this module was the UPBEAT project, a university research project headed by the University Of Salford to create a framework for the assessment of the quality of academic outreach both within and between higher education establishments. However, it was soon realised that a framework based approach to assessments that do not fall within the usual performance indicator based approach would enable a wide range of additional corporate performance information to be included within the Escendency System while still allowing flexibility to fulfil the original remit.
B. How to Use the Assessment Module
The logical sequence to setting up an assessment project is:
- Create Categories and associated Check-lists
- Create Types and assign Categories to Types
- Create individual projects
- Perform assessment tasks for projects
The base unit of assessment is the project which will identify the item being assessed, how it is to be assessed and by whom.
Each project is of a specific type. This will group related projects (e.g. all UPBEAT assessments would be projects of the UPBEAT type, while all Environmental Impact assessments might be projects of the Environmental Impact type).
The project type identifies which categories a project is assessed against. A category defines a checklist of criteria, which is used to assess the level of attainment within a category for a project.
Note: for simpler setup the constituent components of categories and types should be identified before starting setup.
Step 1. Create Assessment categories:
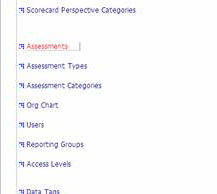
Log in to your control panel. Click on the button
(top RHS of the page). This will link to a pop-up list of all the existing menu
options as well as the three assessment module links (Assessment Categories,
Assessment Types and Assessments):
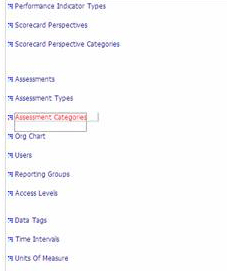
Next, click on the Assessment Categories to access the Assessment Category List:

Click on the add button to create an assessment category:
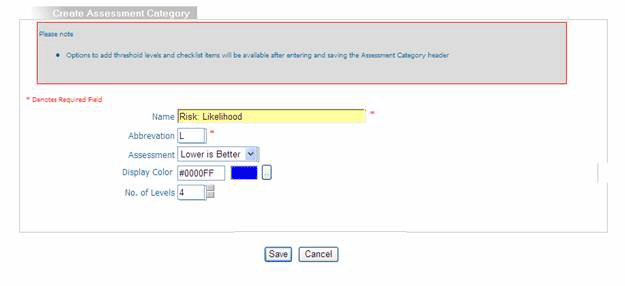
Fill in the category fields as required.
- Name
- identifies the category
- Abbreviation
- brief identifier for the category, to be used in reports where the full name would be too verbose
- No. Of Levels
- identifies the number of assessment levels that can be achieved.
- Assessment
- either higher or lower is better, specifies which behaviour is desirable (in this example lower likelihood of a risk is clearly better)
- Display Colour
- specifies a colour to be used for this category when displayed in graphical reports
- Thresholds
- Each level is assigned a percentage of available �points� that need to be achieved in order to attain that level. Points are defined in the category checklist.
Note: It is recommended that the assessment categories name is prefixed with the assessment type they will constitute. For example: Risk Impact; Employee Assessment - All team building meetings attended; NVQ Level 1 Hospitality � Maintain Customer Care. This will help when selecting the categories from a list to use for the relevant assessment type.
Once fields are filled in click 'Save'. A drop down list of threshold levels will appear:
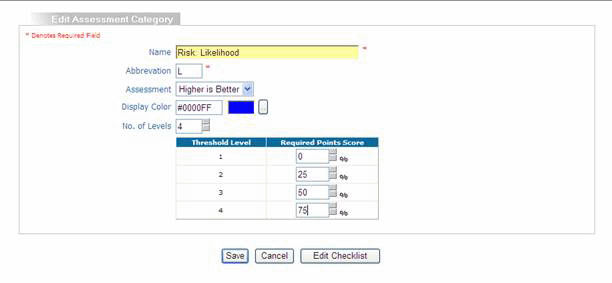
Enter in threshold levels then click �Edit Checklist (the threshold levels will be saved automatically)�. Each threshold level needs a checklist associated with it:

Adding Checklist Item
Click on the 'Add Checklist Item' and fill in the checklist fields as required:

- Description
- A textual description of the checklist item as it is presented when an assessment is made.
- Point Score
- How many points will be scored if this checklist item is selected when performing an assessment
- Mandatory For Level
- If a level is selected in this drop-down, when an assessment is performed it will not be possible to attain the relevant level unless the assessor answers yes to this item. E.g. As part of an employee skills appraisal, an employee requires 65 points to attain level three. However if the checklist item 'Employee possesses intermediate Excel skills' is marked as mandatory for level three, then even if the employee scores more than 65 points they will only be able to attain level two if they answer yes to this item.
- Automatic Level
- If a level is selected in this drop-down, when an assessment is performed, answering yes to this item will lead to the level being achieved regardless of the final point score. E.g. As part of a risk assessment the item "Incident could result in serious injury or death" is marked as automatically achieving level five. When an assessment is performed if this item was marked as yes, then five would be the minimum level attained, regardless of any other answers. Automatic level items will take precedence over Mandatory items.
- Evidence Required
- Selecting 'yes' might not be enough. Supporting evidence might be needed and ticking this box makes addition of supporting evidence when answering the checklist required;
After each item is completed click on 'Add Checklist Item' until all items are completed:
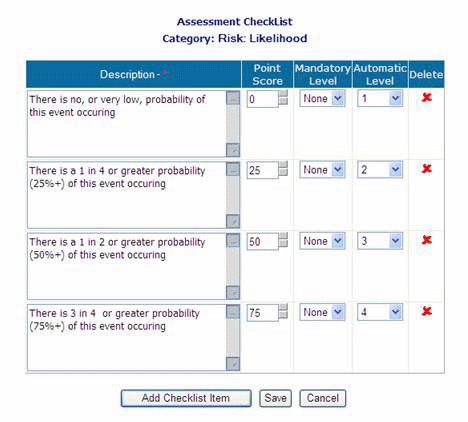
Note: In this example (Risk management module) there is a one to one relationship of checklist items to categories but there could be any number of checklist items depending on the category (e.g. Human Resources assessments).
Once all the necessary checklist items are added (can add more as needed at any time) then click 'Save' and then 'Cancel' to exit.
Create the additional categories needed for the Assessment Type ('Risk: Impact' for the example above). There is no limit to the number of categories that can be created for a given assessment type.
Click 'Save' to save the changes and then 'Cancel' to close the window.
Step 2. Create Assessment Types:
Click on the tool button again (unless the tool page is still open) and select the Assessment Types link:

Click on the Add button in the Assessment Types List:

Fill in the Assessment Types fields as required:
- Name
- Uniquely Identifies the assessment type
- Description
- Provides additional information for the project type
- Score Calculation
- Identifies how an overall score for a project will be calculated (it is recognised that an overall score may not be relevant for all types of project, however it is included for those that require some form of overall ranking, e.g. risk assessments ranked in a risk register.) The options for score calculation are:
- Product
- all category levels are multiplied to produce the overall score
- Sum
- all category levels are added to produce the overall score (default)
- Change
- the difference in level between the baseline level and the current level for each category is summed to produce the overall score
- Categories
- This checkbox list shows every active assessment category defined in the system. Select those categories that will be used in the relevant assessment of this type. It is mandatory to select at least one category per type.
Check the categories relevant to the assessment type.
Note: By careful naming of the categories it's easy to see how assessment types can be variously split up. In the example above, a category could be created for Environmental Assessment that sums up all the categories beginning 'Environmental Assessment' but similarly the assessments could be broken down into 'Environmental Assessment ; Water and Environmental Assessment - Waste etc.
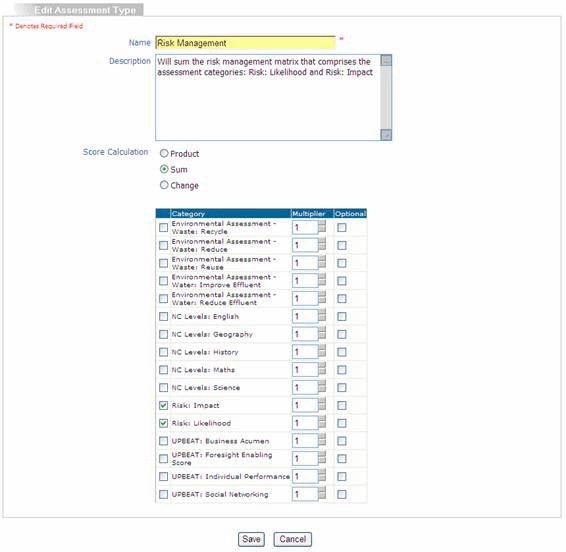
Click 'Save' to save the changes and then 'Cancel' to close the window.
3. Create the Assessment Project
Click on the tool button again (unless the tool page is still open) and select the Assessment link:
Click on the 'Add' button to create an Assessment project:

Fill in the assessment project fields as required:
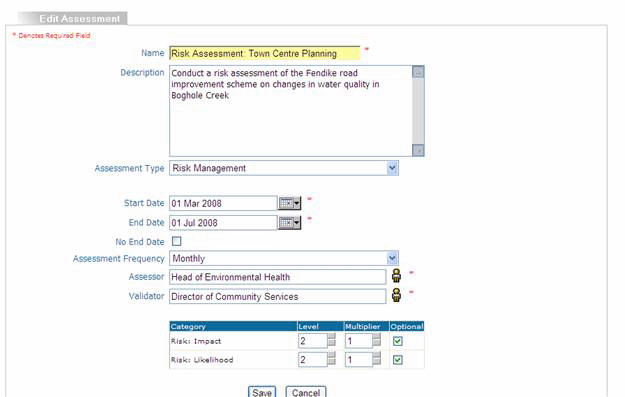
- Name
- Identifies the project and is used in all reports and task lists Assessment Type - This drop down list includes all of the active assessment types defined. Selecting an assessment type will affect which target score options are shown below.
- Start Date
- Identifies when the project begins. An initial baseline assessment task will be due on this date (i.e. it will show up on the assessors tasklist).
- End Date
- Identifies when the project ends (if applicable). The final project assessment will become due on this date.
- No End Date
- For assessments that do not have a specific end date, checking this box will disable the end date field. Assessments will continue to fall due at the appropriate interval while the project remains active.
- Assessment Frequency
- Defines the regular interval when full assessment will become due (It will be possible to perform additional assessments in between these intervals, however these would not replace the regular assessments).
- Assessor
- The identity of the system user who will have main responsibility for assessing the project (this is the user who will receive assessment tasks).
- Validator
- The identity of the system user who will have responsibility for ensuring that an assessment has been correctly performed. The validator and assessor may not be the same system user.
- Category List
- When the fields above have been filled and 'Save' is clicked then the category list will be displayed showing the categories already selected for this assessment type in step 2 (also shown in Figure 13)
- Category
- This section specifies what level of attainment is desired for each assessment category and how category attainment affects the overall rating. This section contains the following fields for each category:
- Level
- specifies the desired final level of attainment for the category (constrained within the range defined by the category)
- Multiplier
- This setting allows different categories within a project to be given different emphasis when calculating the overall attainment score. Each category level will be multiplied by the relevant multiplier before feeding into the score calculation (as defined for the assessment type)
- Optional
- If this checkbox is specified for a category, users will be able to perform ad-hoc assessments without having to fill in the checklist for the category. All categories checklist will still need to be filled when performing scheduled assessments (those which are due at the assessment interval).
Note: In this example, the risk impact checklist in categories could have been expanded to include all events that have been identified as risks for this particular assessment as well as others.
4. Performing Assessments
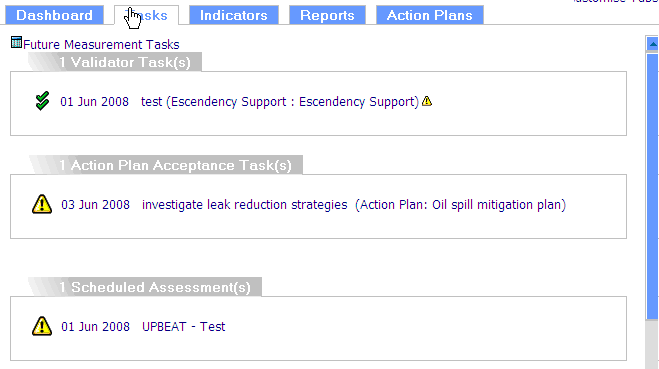
Once an assessment project is set up the assessment tasks will appear in the relevant user's task lists. The first task will be to enter baseline information:
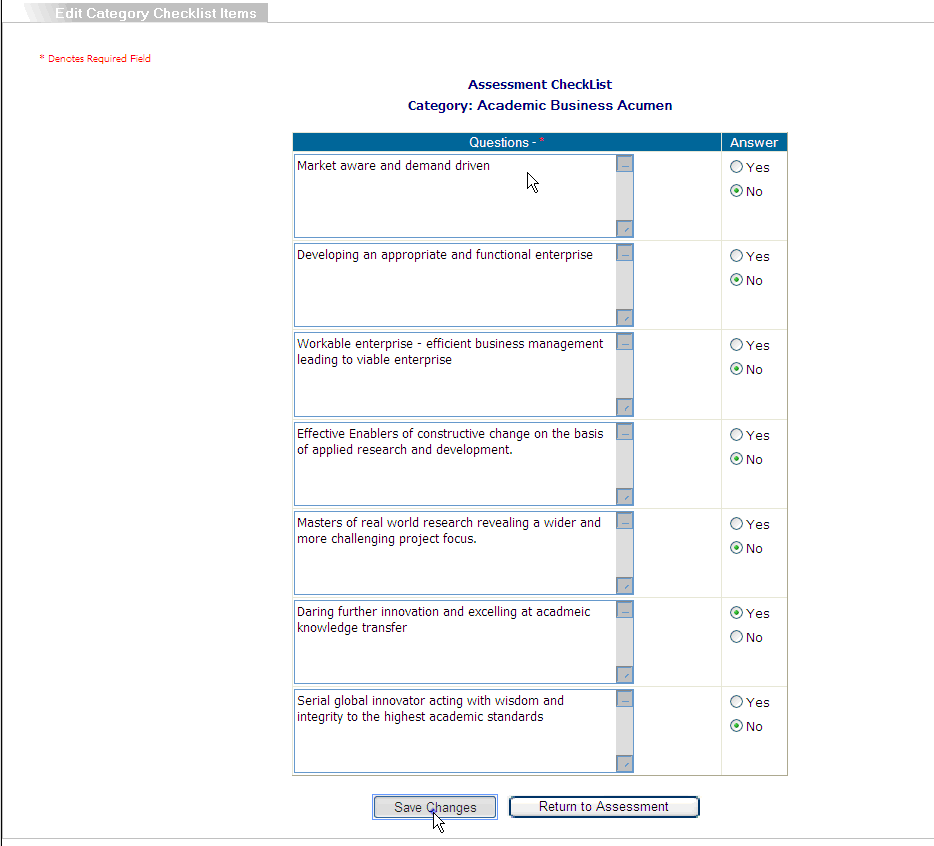
Clicking on the Assessment task will bring up the list of project categories from which the relevant checklist items will be accessed:
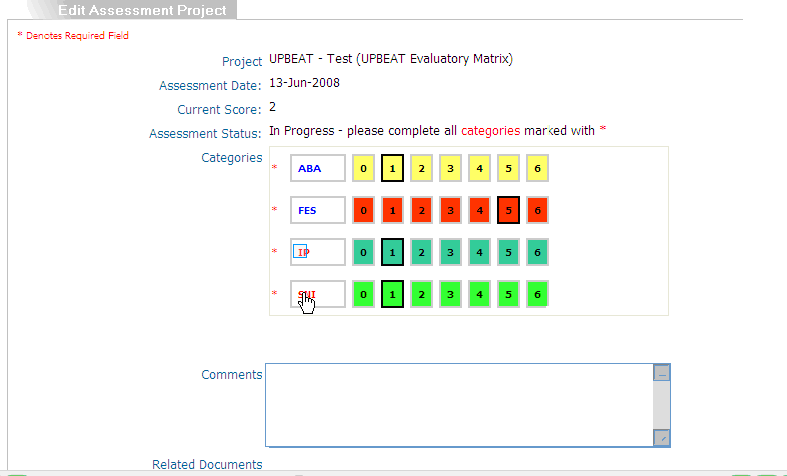
By clicking on each level in turn the checklist will show up and the appropriate checklist questions can be answered for each level:
Once all the categories are checked the assessment is saved. The baseline task will now disappear to be replaced by the first assessment task:
The procedure for filling in the assessment task is identical to completing the baseline task.
5. Reporting Assessments
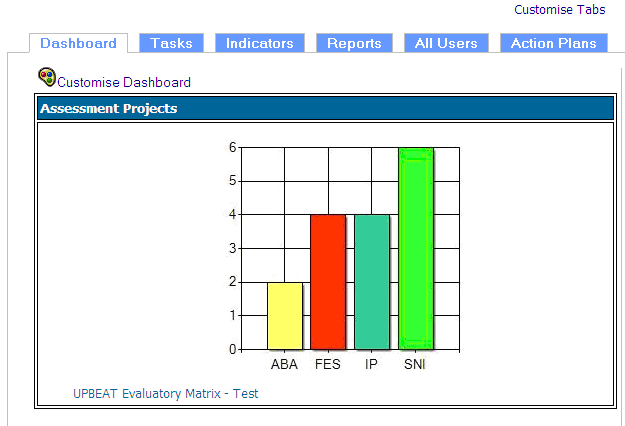
Assessments can be reported either on the dashboard by clicking the customise dashboard link or as a summary report list from the reports tab:

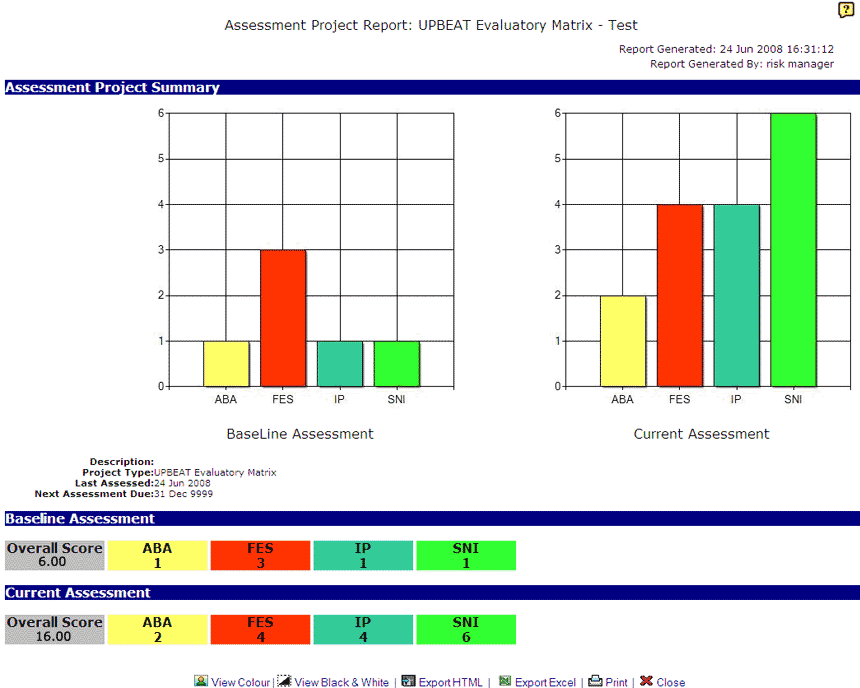
Both reports can be drilled down to their detailed individual reports showing both baseline, current assessment and scores for each category:
Assessment graphs can also be displayed as a rose diagram by selecting the rose diagram option in the customise dashboard window:
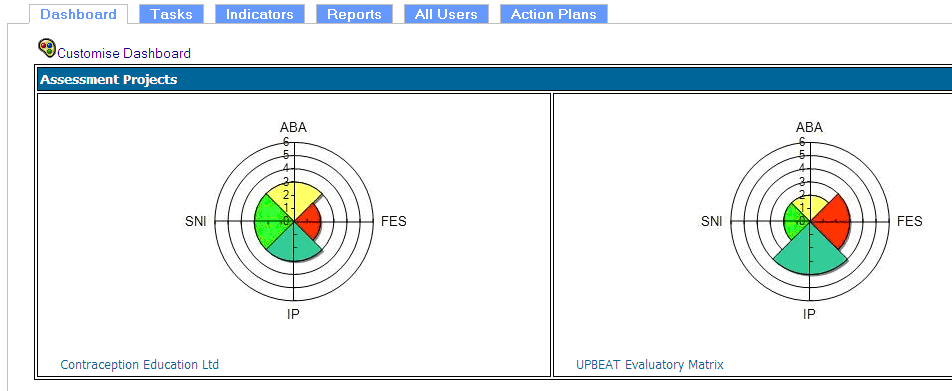
Clicking on the assessment graph in the dashboard will drill down to the complete assessment project report including baseline and current assessment:
An assessment summary report can be accessed from the Assessment Report option in the report tab and is a list of all available assessment projects listed by type:

Clicking on each report in the list will drill down to the detailed assessment report:
Assessment Module Frequently Asked Questions
- Question: We have set up an assessment with two category checklist but when we click on ‘Assess Now’ option in the assessment project edit window we go to a window saying all checklist items are complete but they are not.
- Answer: Make sure that you have actually attached the categories to the relevant assessment type (go to Assessment Type option in Tools and select the relevant checklist items from the list). There is a one to one relationship between an assessment project and its type thereby allowing multiple assessments to be performed with the same checklist items. If you require slightly different checklists for a project you must create a separate type to customise the checklists used.
![]()
![]()