- 1INTRODUCTION
- 2SETTING UP A NEW SYSTEM
- 2.1The Organisation Structure
- 2.1.1Creating, Editing and Deleting Organisation Chart Items/Adding Posts
- 2.2Users
- 2.2.1Creating, Editing and Deleting Users
- 2.2.2Supporting Data
- 2.2.2.1Access Levels and User Groups
- 2.2.2.2Reporting Group
- 2.3The Strategy Map
- 2.3.1Overview - Flat and Complex Models
- 2.3.2Creating, Editing And Deleting Strategy Map Items
- 2.3.3Strategy Item Types
- 2.3.4StrategyMap Performance Target items
- 2.3.5Strategic Contributions
- 2.3.5.1Normalising Strategic Contributions
- 2.3.5.2Flat Strategy Map
- 2.3.6 Strategy Map Tags
- 2.3.6.1Overview
- 2.3.6.2Setting up data tags
- 2.3.6.3Attaching data tags to performance targets
- 2.3.6.4Reporting data tags
- 2.4Performance Indicators
- 2.4.1Overview
- 2.4.2Performance Indicator List
- 2.4.3Creating, editing and deleting Performance Indicators
- 2.4.4Perspectives and Indicator Types
- 2.4.5Performance Indicators Set Up Considerations
- 2.4.6Supporting data
- 2.4.6.1Performance Indicator Categories
- 2.4.6.2Performance Indicator Types
- 2.4.6.3Scorecard Perspectives
- 2.4.6.3.1How to use Perspectives
- 2.4.6.4Scorecard Perspective Categories
- 2.4.6.4.1How to use Perspective Categories
- 2.4.6.4Units of Measure
- 2.4.6.5Time Intervals
- 2.5Equation Builder
- 2.5.1Creating, Editing, Deleting Equations
- 2.5.1.1Measurements
- 2.5.1.2Parameters
- 2.5.1.3Equations
- 2.5.1.4Example Equation
- 2.5.1.5Attaching Equations to Performance Indicators
- 2.5.1.6Using Performance Indicators in an Equation
- 2.5.1.7Equation measurement workflow
- 2.5.1Creating, Editing, Deleting Equations
- 3PERFORMANCE TARGETS
- 3.1Overview
- 3.2Rules Governing Performance Targets
- 3.3Target Setup: Add/View Targets
- 3.4Target Setup: Target Creation Wizard
- 3.5Entering Target Measurements, Validation and Reporting
- 3.6Editing target fields and related objects
- 3.6.1Edit target fields
- 3.6.2Edit target measurements
- 3.6.3Edit target comments
- 3.6.4Edit target delegation
- 3.7Add/View Responsibility
- 3.8Editing target value for more than one measurer
- 3.9Ending targets
- 3.10TargetExport and Import
- 3.11Exporting Target Data
- 3.12Importing Performance Data (from Measurement Entry window)
- 4ACTION PLANNING
- 5ASSESSMENTS
- 6THE CONTROL PANEL
- 6.1Header Buttons
- 6.2Control Panel tabs: Overview
- 6.3Control Panel display
- 6.4Control Panel tabs
- 6.4.1Dashboard Tab
- 6.4.2Task Tab
- 6.4.2.1Measurement Tasks
- 6.4.2.2Validation Tasks
- 6.4.2.3Action Plan Tasks
- 6.4.3.4Assessment Tasks
- 6.4.3.5Measurement Planner
- 6.4.3Performance Targets Tab
- 6.4.4Reports Tab
- 6.4.5Staff and All Users Tab
- 6.4.6Action Plan Tab
- 7REPORTS
- 8SYSTEM MAINTENANCE
- 9HELP AND SUPPORT
- 2.1The Organisation Structure
Users
- Creating, Editing and Deleting Users
- How To Fill in a User Edit Page
- Supporting Data
- Access Levels and User Groups
- Reporting Group
The users module allows individuals to be entered into the system, along with their access levels, grouping, reporting groups (where applicable) and of course user names and password.
Creating Editing and Deleting Users
The User module is accessed from the  button. Clicking on the link accesses the user list page that displays all current
users within the system:
button. Clicking on the link accesses the user list page that displays all current
users within the system:
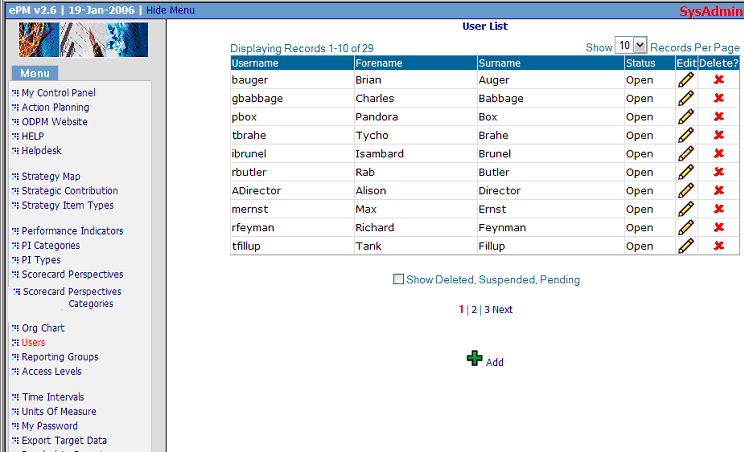
The User list page functions the same way as other Escendency list pages.
Users can be created, deleted, edited and assigned to user
groups with specific privileges. Only users with the relevant administrative
options can access this page. To add a new user, click on the ![]() Add
link. To edit an existing user, click on the
Add
link. To edit an existing user, click on the ![]() icon
next to the appropriate user. To delete a user, click on the
icon
next to the appropriate user. To delete a user, click on the ![]() icon
next to the appropriate user (a dialog box will appear asking you to confirm
your choice).
icon
next to the appropriate user (a dialog box will appear asking you to confirm
your choice).
When either the add or edit option is selected, the user edit page below will appear (showing the details of the chosen user if editing):
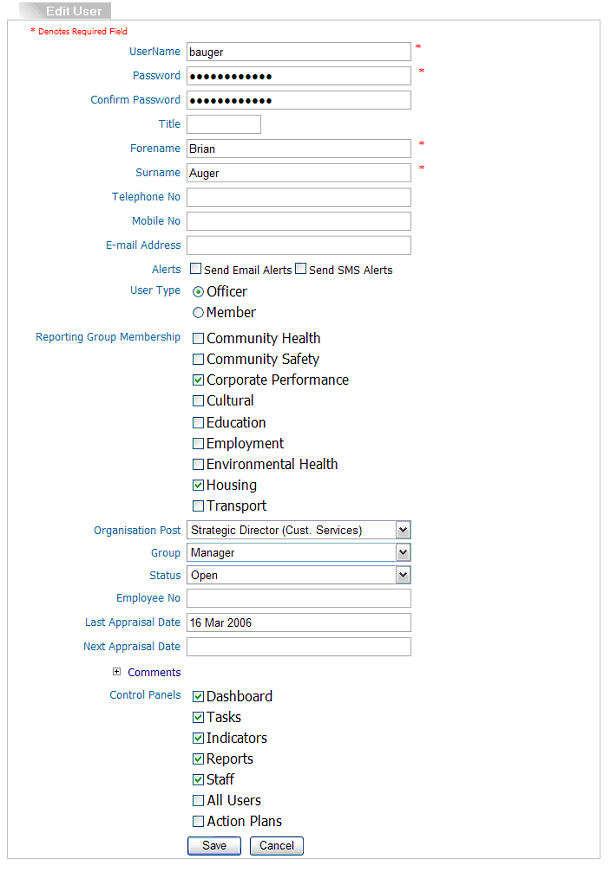
How To Fill in a User Edit Page
At a minimum a user must have a password and username, but all other fields are optional.
The user's password must be entered twice. In this page, it is possible to create a password that is less than six characters long and that may be the same as the user's previous password or the same as their username. Note: This is not the user specific change password page.
Email and SMS alerts
Allows users to be informed about tasks of theirs that have become due/overdue within the system.
User Type
- Officers
- "Organisation post" is available to users who have been added as Officers. It is a list of all the vacant posts within the organisation. Select a post to assign a user to that post.
- Members
- Members can only gain read only access to the system and then only to those parts permitted by their access level as created in the Access Levels module.
Reporting Group Membership
If the organisation has no reporting groups set up this list would be empty. Otherwise, users can be linked to all the relevant groups in the list and recieve access to those group's reports. In this example, if user bauger logged into the system they would see 'Housing' under the group report list in the report tab. See for All Group Report for an example of a group report.
Organization Post
Select the post the user is to assigned to (figure 2). Only vacant posts show on the dropdown list and then only if the user is an officer not a member. A user can only be associated with one post and when that association is made that post will not appear in the organisation post dropdown. See adding a post in organisation help for information on setting up posts.
Access Level
Select the user Access Level from this dropdown list. The Escendency system defaults are Administrator, Manager and User with Administrator having system administrator rights (i.e. all that are available) and Manager and User having equally limited read access. Access for each of these levels can be added/removed in the Access Levels module. There is no limit to the number of Access Levels that can be created (e.g. Auditor with read right access only to all report, Action Planning with access only to create, edit and report on action plans).
Status
Select open if the user is active in the system.
Employee No.
This would be a number defined by the organisation.
Last/Next Appraisal Date:
Entering a date (dd-mon-yyyy) for next appraisal will result in the user's line manager receiving notification on that date in their task list that a user appraisal task is due.
Comments
Expand the + icon to display a text field to add relevant comments.
Control Panels
Check the control panel tabs that the user will see in their control panel. Depending on the user's rights they can update the tabs available to them from the customise tabs option in the control panel.
Proceed to next page for users supporting data:
![]()
![]()